Introduction
Capacitors are essential components in many electronic devices, from household appliances to industrial equipment. When these components fail, they can lead to malfunctioning systems or complete breakdowns. Testing a capacitor is a straightforward yet crucial process, whether you’re diagnosing an issue with a household appliance or a complex HVAC system. In this guide, we’ll walk you through different methods for testing a capacitor, including how to use a multimeter, voltmeter, and testing methods specific to HVAC and other devices. Whether you’re a DIY enthusiast or a professional technician, understanding how to test capacitors effectively will save time and ensure proper functioning of your devices.
What Is a Capacitor?
How to Test a Capacitor Before we dive into the testing process, let’s take a quick look at what a capacitor is and why it’s used in electronic circuits. A capacitor is an electronic component that stores electrical energy temporarily and releases it when needed. It consists of two conductive plates separated by an insulating material called a dielectric. Capacitors are essential in filtering signals, stabilizing voltage, and temporarily storing energy in circuits.
Why Test a Capacitor?
Capacitors can degrade or fail due to several reasons, including:
- Aging: The dielectric material can wear out over time.
- Excessive Voltage or Current: Overvoltage can damage the internal structure of the capacitor.
- Heat: High temperatures can cause leakage or complete failure of the capacitor.
Testing a capacitor regularly helps to ensure that devices are operating at their best and prevents costly repairs.
How to Test a Capacitor with a Multimeter
One of the most effective ways to test a capacitor is using a multimeter. Follow these steps for accurate results:
Step 1: Discharge the Capacitor
Before testing, make sure the capacitor is discharged to avoid any potential electrical shocks. You can short the leads of the capacitor with a screwdriver (using an insulated handle).
Step 2: Set Your Multimeter
Set your multimeter to measure resistance (Ω). If your multimeter has a capacitance setting, you can use that for more accurate results.
Step 3: Connect the Multimeter Leads
Attach the multimeter leads to the two terminals of the capacitor. For non-polarized capacitors, the leads can be attached in any order. If it’s a polarized capacitor (e.g., electrolytic), connect the red lead to the positive terminal and the black lead to the negative terminal.
Step 4: Observe the Reading
Initially, the resistance should show a low value and then increase gradually. This increase happens because the capacitor is charging. A high stable resistance indicates that the capacitor is working well, while a low or fluctuating reading may indicate a problem.
Step 5: Check the Capacitance (If Applicable)
If your multimeter has a capacitance setting, you can check the actual capacitance value. Compare it to the capacitor’s rated value (printed on the component). A significant deviation could indicate a faulty capacitor.
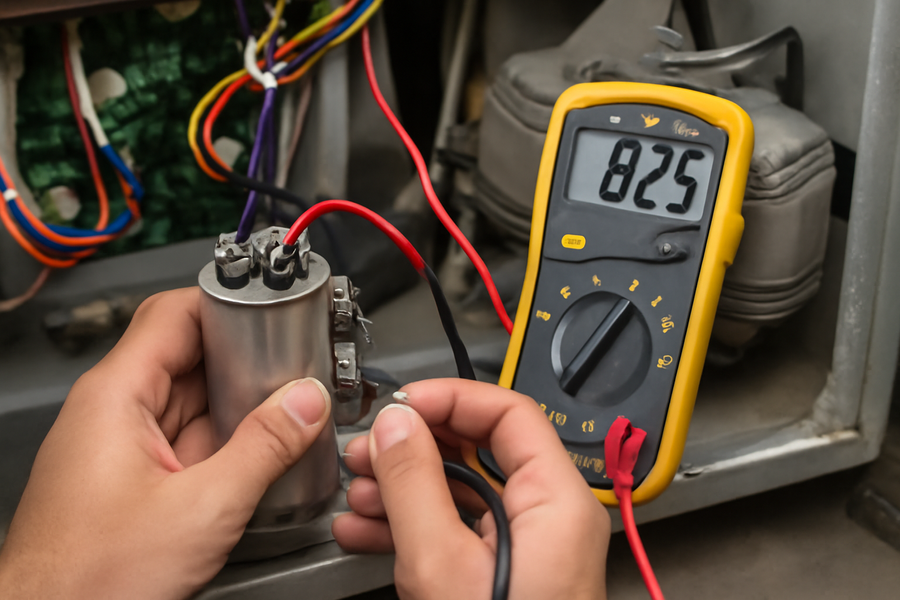
How to Test a Capacitor in HVAC Systems
HVAC systems often use larger capacitors, which are crucial for motors and compressors. Testing these capacitors follows similar steps, but with a few added precautions:
Step 1: Turn Off Power to the HVAC System
Safety is key. Always turn off the power to the HVAC system before beginning any maintenance.
Step 2: Locate the Capacitor
In HVAC systems, capacitors are typically found near the compressor or fan motor. These capacitors can be oval or round in shape and often have exposed terminals.
Step 3: Discharge the Capacitor
Capacitors in HVAC systems can store significant energy. Use an insulated tool to short the terminals and discharge the capacitor safely.
Step 4: Set the Multimeter to Measure Capacitance
Set your multimeter to measure capacitance if it has that setting. This will give you a direct reading of the capacitor’s condition.
Step 5: Compare with Manufacturer Specifications
Check the capacitance reading and compare it with the manufacturer’s specifications. A noticeable difference could indicate that the capacitor is faulty and needs replacement.
How to Test a Capacitor in Circuit
Sometimes, you don’t have the option to remove a capacitor from the circuit for testing. Fortunately, you can still test it in-circuit by following these steps:
Step 1: Identify the Capacitor
Locate the capacitor in the circuit. It may be connected to a resistor or diode. Make sure the system is powered off before you begin testing.
Step 2: Set the Multimeter to Measure Voltage
If you’re using a multimeter or voltmeter, set it to measure AC or DC voltage, depending on the circuit.
Step 3: Measure the Voltage Across the Capacitor
Place the probes of your multimeter across the capacitor terminals. If the capacitor is functioning correctly, you should see a gradual increase in voltage over time as it charges.
Step 4: Test for Leakage Current
If your multimeter has the option to check for leakage current, it’s important to do so. A good capacitor will show minimal or no leakage current. A high leakage value can signal that the capacitor is failing.
How to Test a Capacitor with a Voltmeter
Testing a capacitor with a voltmeter is less common but can be done under specific conditions:
Step 1: Discharge the Capacitor
Always discharge the capacitor before testing to avoid electrical shock.
Step 2: Set the Voltmeter to the Correct Voltage
Set your voltmeter to measure either DC or AC voltage, depending on the capacitor’s application.
Step 3: Measure the Voltage
Connect the voltmeter probes to the capacitor’s terminals. As the capacitor charges, you should see a gradual increase in voltage. If the voltage remains constant or doesn’t increase, the capacitor may be defective.
Signs of a Bad Capacitor
Here are common signs that a capacitor may be faulty:
- Visible Damage: If the capacitor is leaking, bulging, or discolored, it may be damaged.
- Failure to Power the Device: If the device fails to turn on or function properly, the capacitor might be faulty.
- Strange Sounds: Humming or buzzing sounds often signal that a capacitor is malfunctioning.
- Overheating: Capacitors that overheat may cause damage to other components in the system.
Conclusion
Testing a capacitor is a critical step in diagnosing electrical problems in devices ranging from HVAC systems to household electronics. By using tools like multimeters, voltmeters, and capacitance testers, you can quickly determine if a capacitor is in good condition or needs replacement. Regular capacitor testing can help ensure that your devices operate smoothly, preventing unnecessary repairs.